To adjust a 2-cycle carburetor, locate the adjustment screws and start the engine to warm it up. Then, turn the high-speed and low-speed screws to reach the desired performance and ensure the engine runs smoothly.
Adjusting a 2-cycle carburetor is essential for optimal engine performance. By fine-tuning the air and fuel mixture, you can improve power output and fuel efficiency. Whether you’re working on a chainsaw, leaf blower, or weed eater, knowing how to adjust the carburetor can prevent engine issues and ensure your equipment functions effectively.
This guide will provide step-by-step instructions for adjusting a 2-cycle carburetor, helping you achieve peak performance and prolong the life of your equipment. With a few simple adjustments, you can keep your 2-cycle engine running smoothly and efficiently.
Contents
- 1 Understanding Carburetor Basics
- 2 Signs Of Carburetor Maladjustment
- 3 Adjusting 2 Cycle Carburetors Step-by-step
- 4 How To Access And Identify Adjustment Features
- 5 Fine-tuning For Optimal Performance
- 6 How To Test And Rework Adjustments
- 7 Maintenance Tips For 2 Cycle Carburetors
- 8 Frequently Asked Questions
- 9 Final Thoughts
Understanding Carburetor Basics
Before diving into the process of adjusting a 2-cycle carburetor, it’s crucial to have a solid grasp of the fundamental principles behind carburetion. Understanding the basics of carburetor operation will not only help you troubleshoot issues more effectively but also empower you to optimize the performance of your 2-cycle engine.
Importance Of Proper Carburetion In 2 Cycle Engines
Proper carburetion in 2-cycle engines is vital for efficient and reliable operation. Achieving the ideal fuel-to-air ratio ensures optimal combustion, maximizing power output and extending the lifespan of the engine. Inadequate carburetion can lead to poor performance, excessive fuel consumption, and potential engine damage.
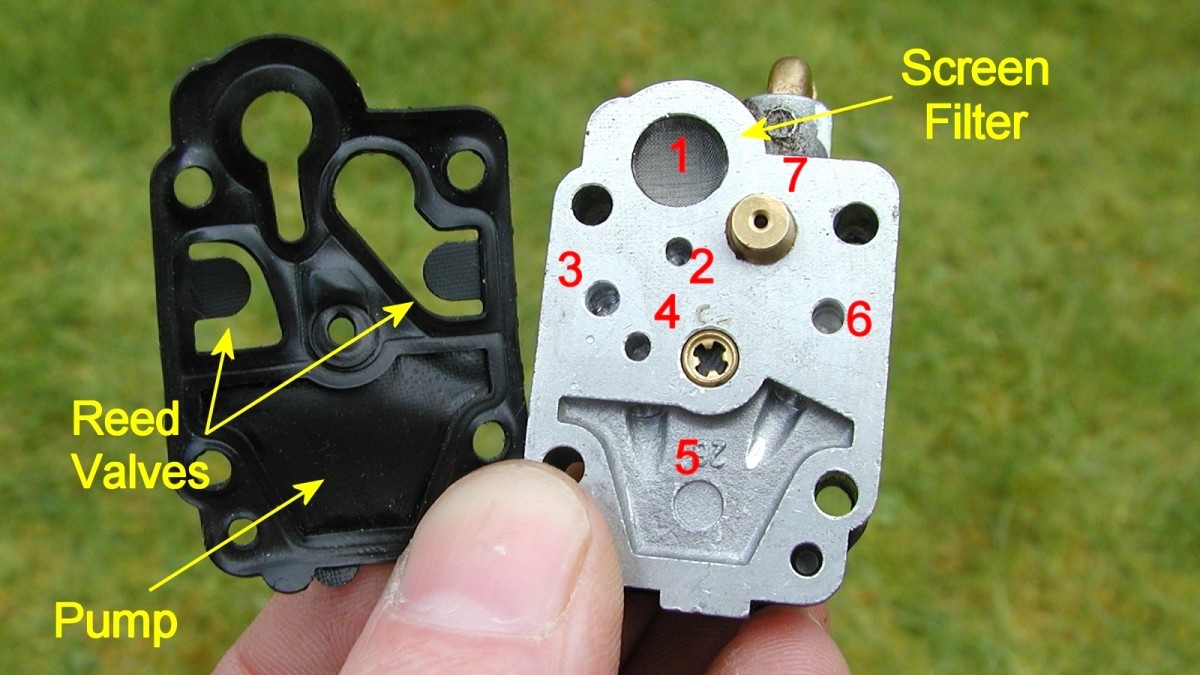
Anatomy Of A 2 Cycle Carburetor
The 2-cycle carburetor consists of several key components that work in tandem to regulate the flow of fuel and air into the engine. By understanding the anatomy of the carburetor, you can better grasp how these parts influence the engine’s performance and make informed adjustments as needed.
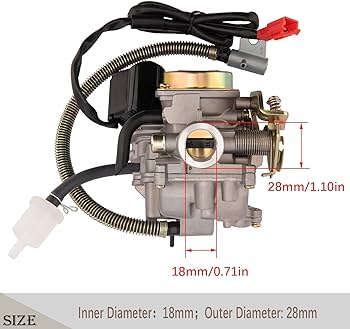
Roles Of Main Components: Fuel Intake, Air Mixture, Throttle Valve
The fuel intake, air mixture, and throttle valve are the primary components that directly impact the carburetor’s function. Each component plays a crucial role in maintaining the proper fuel-to-air ratio and managing the engine’s speed and power output. Understanding their roles is essential for diagnosing and addressing carburetor issues effectively.
By gaining a deeper understanding of the carburetor basics and the roles of its main components, you’ll be better equipped to tackle the task of adjusting a 2-cycle carburetor with confidence.
Signs Of Carburetor Maladjustment
When a 2-cycle engine is not performing at its best, the culprit might be a carburetor maladjustment. Understanding the signs of a maladjusted carburetor is crucial for maintaining the engine’s optimal performance. Let’s delve into the symptoms of a rich or lean fuel mixture, discuss how altitude and temperature affect carburetor settings, and explore the performance issues caused by improper adjustment.
Symptoms Of A Rich Or Lean Fuel Mixture
A rich fuel mixture occurs when there is too much fuel in the air-fuel mixture. This can lead to symptoms such as black smoke emitting from the exhaust, fouled spark plugs, and engine hesitation. On the other hand, a lean fuel mixture means there is too little fuel in the mixture, commonly resulting in symptoms such as engine overheating, lack of power, and engine stalling.
Effects Of Altitude And Temperature On Carburetor Settings
Altitude and temperature can significantly impact carburetor settings. When operating at higher altitudes, the air is thinner, which results in a lower oxygen content. A carburetor set for sea level may run too rich at higher altitudes. Similarly, temperature affects air density, impacting the air-fuel mixture. Cold temperatures may require a richer mixture, while hot temperatures may necessitate a leaner mixture.
Recognizing Performance Issues Due To Improper Adjustment
Improper carburetor adjustment can manifest in a variety of performance issues. These include hard starting, rough idling, loss of power, and excessive fuel consumption. These issues can not only hamper the engine’s performance but also lead to increased emissions and decreased fuel efficiency. Properly adjusting the carburetor is essential for maximizing the engine’s lifespan and maintaining its performance.
Adjusting 2 Cycle Carburetors Step-by-step
Adjusting the carburetor of a 2-cycle engine is crucial for maintaining optimal performance. Whether it’s a chainsaw, trimmer, or leaf blower, a well-adjusted carburetor ensures efficient fuel combustion and smooth engine operation. In this guide, we’ll walk you through the step-by-step process of adjusting 2-cycle carburetors to keep your equipment running at its best.
Necessary Tools For Carburetor Adjustment
Before starting the adjustment process, ensure you have the necessary tools at hand. The tools required for adjusting a 2-cycle carburetor typically include a screwdriver set, a tachometer, and a carburetor adjustment tool. These tools will assist in fine-tuning the carburetor for optimal engine performance.
Safety Precautions Before Starting The Process
Prior to beginning the carburetor adjustment, it is essential to observe safety precautions. Ensure that the engine is turned off and cool to avoid any accidental starts or burns. Additionally, it’s important to work in a well-ventilated area to minimize exposure to exhaust fumes. Lastly, always wear safety goggles and gloves to protect your eyes and hands while working on the carburetor.
Initial Setup And Locating The Adjustment Screws
First, consult the equipment’s manual to locate the carburetor adjustment screws. Typically, there are three screws: the idle speed screw, the low-speed fuel mixture screw, and the high-speed fuel mixture screw. Once located, carefully adjust each screw according to the manufacturer’s specifications. Use the tachometer to determine the correct engine speed for both idle and high-speed settings.
How To Access And Identify Adjustment Features
Accessing and identifying adjustment features on a 2 cycle carburetor is crucial for efficient engine performance. Whether you’re a seasoned mechanic or a DIY enthusiast, understanding the process is key to achieving optimal results. In this section, we’ll provide a detailed walkthrough for accessing the carburetor and identifying the functions of the H (High), L (Low), and T (Idle) screws.
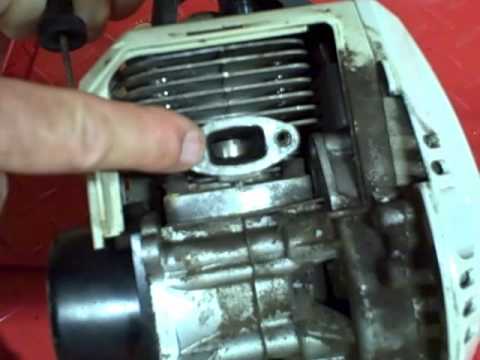
Detailed Walkthrough To Access The Carburetor
Accessing the carburetor on a 2 cycle engine involves a systematic approach to ensure smooth operation. Follow these steps to access the carburetor:
- Locate the air filter cover and use a screwdriver to remove it.
- Once the air filter cover is removed, you’ll have clear visibility of the carburetor.
- Depending on the model, you may need to remove additional components to access the carburetor fully.
Identifying And Understanding The Functions Of H (high), L (low), And T (idle) Screws
Understanding the functions of the adjustment screws is essential for fine-tuning the carburetor. Here’s a brief overview:
| Adjustment Screw | Function |
|---|---|
| H (High) Screw | Controls the fuel mixture at high speeds. Turning it clockwise will lean the mixture, while turning it counterclockwise will richen it. |
| L (Low) Screw | Regulates the fuel mixture at idle and low speeds. Similar to the H screw, it controls the air-to-fuel ratio, with clockwise turns leaning the mixture and counterclockwise turns richening it. |
| T (Idle) Screw | Adjusts the engine’s idle speed. Turning it clockwise increases the idle speed, while counterclockwise turns decrease it. This screw does not directly affect the air-to-fuel ratio. |
Fine-tuning For Optimal Performance
Fine-tuning a 2-cycle carburetor is crucial to achieving optimal performance from your equipment. By adjusting the idle, high-speed, and low-speed screws, you can ensure that the carburetor delivers the perfect air-to-fuel mixture, leading to smooth operation and enhanced power output.
Step-by-step Method To Adjust The Idle Screw (t)
The idle screw, also known as the “T” screw, controls the engine’s idle speed. To adjust the idle screw:
- Start by warming up the engine to its normal operating temperature.
- Using a screwdriver, turn the idle screw clockwise to increase the idle speed or counterclockwise to decrease it.
- Ensure the engine runs smoothly at the desired idle speed before tightening the screw securely.
Techniques To Adjust The High-speed Screw (h)
The high-speed screw, represented by the “H” marking, regulates the fuel mixture at higher engine speeds. Here’s how to adjust it:
- Run the engine at full throttle and listen to its sound to determine if it’s running too rich or lean.
- If it’s running too rich, turn the high-speed screw clockwise to lean the mixture, or counterclockwise if it’s running too lean.
Methods For Adjusting The Low-speed Screw (l)
The low-speed screw, indicated by the “L” marking, influences the fuel mixture at lower engine speeds. Follow these steps to adjust it:
- Adjust the low-speed screw to achieve the smoothest and strongest idle at the lowest RPM possible.
- Turn the screw in small increments and listen to the engine’s sound to find the optimal setting.
How To Test And Rework Adjustments
Adjusting the carburetor of a 2-cycle engine is crucial to maintaining peak performance. Once adjustments are made, it’s important to properly test and rework adjustments based on the engine’s responsiveness and performance. Understanding how to test and rework adjustments is essential to ensuring optimal engine performance.
Properly Testing Engine Responsiveness On Adjustments
When making adjustments to the 2-cycle carburetor, it’s essential to properly test the engine’s responsiveness to ensure the adjustments are effective. One method is to test the throttle response by quickly squeezing and releasing the throttle lever or trigger. Observe the engine’s response and note any hesitations, stalling, or rough running. This helps in determining whether the adjustments made have positively or negatively impacted the engine’s performance.
Fine-tuning Based On Engine Performance Feedback
Based on the engine’s performance feedback, fine-tuning the adjustments may be necessary. Hesitation or rough running often indicates a lean condition, while smoking or loss of power may signal a rich condition. Fine-tune the adjustments by carefully turning the adjustment screws in small increments and retesting the engine’s responsiveness. Proper fine-tuning ensures the engine is functioning optimally and efficiently.
When To Know Further Adjustments Are Necessary
Understanding when further adjustments are necessary is crucial. If the engine continues to exhibit poor responsiveness, it’s important to consider further adjustments. Additionally, if the engine shows signs of running too lean or rich despite adjustments, further tuning may be required. Regularly testing and analyzing the engine’s performance will indicate if further adjustments are necessary.
Maintenance Tips For 2 Cycle Carburetors
When it comes to maintaining the functionality of your 2 cycle carburetor, regular maintenance is essential. With routine check-ups, proper cleaning techniques, and best practices for storing and caring for 2 cycle engines, you can ensure the sustained health and functionality of your carburetor.
Routine Check-ups For Sustained Carburetor Health
Regular maintenance and routine check-ups are crucial to maintaining the health of your 2 cycle carburetor. Here are some key points to consider during routine check-ups:
- Check the air filter for any signs of dirt or debris accumulation, and clean or replace it as necessary.
- Inspect the fuel lines and connections for any signs of wear or damage, and replace them if needed.
- Ensure that all bolts and screws are securely tightened to prevent any air or fuel leaks.
- Adjust the idle and high-speed settings as per the manufacturer’s guidelines to ensure optimal performance.
Cleaning Tips To Ensure Long-term Functionality
Proper cleaning of the carburetor is essential for its long-term functionality. Here are some tips for effectively cleaning your 2 cycle carburetor:
- Use a carburetor cleaner specifically designed for 2 cycle engines to remove any built-up dirt, varnish, or deposits.
- Disassemble the carburetor carefully and clean each component thoroughly with the carburetor cleaner and a small brush.
- Inspect the needle and seat for any signs of wear or damage, and replace them if necessary.
- Reassemble the carburetor components carefully, ensuring they are properly aligned and secured.
Best Practices For Storing And Caring For 2 Cycle Engines
Storing and caring for your 2 cycle engine properly is essential for maintaining the longevity of the carburetor. Here are some best practices to consider:
| Storage and Care Tips |
|---|
| Use a fuel stabilizer in the fuel tank to prevent the formation of varnish or gum deposits during storage. |
| Run the engine dry or drain the fuel tank before storing to minimize the risk of fuel deterioration. |
| Store the engine in a dry and well-ventilated area to prevent moisture buildup and potential corrosion. |
| Follow the manufacturer’s recommendations for winterizing the engine before prolonged periods of inactivity. |
Frequently Asked Questions
What Are The Signs Of A 2-cycle Carburetor Needing Adjustment?
If your 2-cycle engine is idling rough, has poor acceleration, or is stalling, it may need carburetor adjustment. Look for black exhaust smoke or difficulty starting as well.
How Often Should I Adjust The Carburetor On My 2-cycle Engine?
Adjust your 2-cycle carburetor if the engine is not running smoothly or if you notice performance issues. It’s recommended to check and potentially adjust the carburetor after using several tanks of fuel.
Is Adjusting A 2-cycle Carburetor A Complicated Process?
Adjusting a 2-cycle carburetor can be a straightforward process when following the manufacturer’s guidelines. While it requires attention to detail, basic knowledge of engine mechanics can make it an achievable task.
Final Thoughts
Learning how to adjust a 2-cycle carburetor is a valuable skill for anyone who uses small engine equipment. By following the steps outlined in this blog post, you can ensure your equipment runs smoothly and efficiently. Regular maintenance and proper adjustments will prolong the life of your equipment and save you time and money in the long run.
Mastering this skill will give you the confidence to tackle carburetor adjustments on your own, without having to rely on costly professional services. Keep these tips in mind and enjoy the benefits of a well-tuned 2-cycle engine.