Scooter running lights not working? Check the bulbs and electrical connections for any faults.
Facing issues with the running lights on your scooter? It can be frustrating, but don’t worry, there are a few possible reasons why this might be happening. We will explore common causes and solutions for scooter running lights not working.
By following these troubleshooting steps, you can quickly identify and resolve the problem, getting your scooter back on the road safely. So, let’s dive in and get those lights shining bright again!
Contents
Common Causes
If you’re experiencing issues with your scooter’s running lights not working, there are several common causes that you should investigate. Understanding these causes can help you troubleshoot the problem and get your scooter’s lights back up and running in no time.
Faulty Bulbs
One common cause of scooter running lights not working is faulty bulbs. Over time, bulbs can wear out or burn out completely. Inspect the bulbs to see if they are visibly damaged or if the filament inside has snapped. If so, it’s likely that the bulbs need to be replaced.
Blown Fuse
Another possible cause of running lights not working is a blown fuse. The fuse is designed to protect the electrical system by breaking the circuit when an electrical overload occurs. A blown fuse can be identified by a break in the metal strip visible inside the fuse. If the fuse is blown, it will need to be replaced with a new one of the correct amperage rating to restore power to the running lights.
Wiring Issues
Wiring issues can also lead to non-functioning running lights on your scooter. Over time, wiring connections can become loose or corroded, disrupting the flow of electricity. Inspect the wiring harness and connections for any signs of damage or poor connections. If any issues are found, they should be repaired or replaced. Additionally, check for any frayed or damaged wires that may need to be repaired or rewired.
In conclusion, when your scooter’s running lights are not working, it’s important to investigate common causes such as faulty bulbs, blown fuses, and wiring issues. By identifying the specific cause of the problem, you can address it accordingly and ensure that your scooter’s lights are functioning properly once again.

Credit: www.amazon.com
Troubleshooting Steps
Having issues with your scooter running lights not working? Don’t worry, we’ve got you covered. Follow these simple troubleshooting steps to identify and fix the problem.
Check Bulbs
If your scooter running lights are not working, the first thing you should check is the bulbs. Sometimes, a burnt-out bulb can be the culprit behind the issue. Here’s what you need to do:
- Locate the running light bulbs on your scooter. Refer to your scooter’s manual if you are unsure.
- Carefully remove the bulb and inspect it for any signs of damage, such as a broken filament or blackened glass.
- Replace the bulb if necessary. Make sure to use the correct type and wattage as specified in your scooter’s manual.
- Insert the new bulb securely into the socket, taking care not to touch the glass with your bare hands (use gloves or a clean cloth).
Once you have replaced the bulb, test the running lights to see if they are working properly.
Inspect Fuse
If checking the bulbs didn’t solve the issue, the next step is to inspect the fuse. A blown fuse can prevent the running lights from functioning correctly. Follow these steps to check the fuse:
- Locate the fuse box on your scooter. It is typically located under the seat or near the battery.
- Open the fuse box and identify the fuse responsible for the running lights. Again, consult your scooter’s manual if needed.
- Visually inspect the fuse to see if it is blown. A blown fuse will have a broken filament or a discolored appearance.
- If the fuse is blown, replace it with a new one of the same amperage rating.
After replacing the fuse, test the running lights to check if they are now working.
Test Wiring
If the running lights are still not working after checking the bulbs and inspecting the fuse, it’s time to test the wiring. Follow these steps to ensure there are no faults in the wiring:
- Inspect the wiring connections for any signs of damage, such as loose or disconnected wires.
- Ensure all connections are secure and free from corrosion. Clean any corrosion using a wire brush if necessary.
- Use a multimeter or a continuity tester to test the wiring for any breaks or shorts.
- If any faulty wiring is found, repair or replace it accordingly.
Once you have tested and fixed any wiring issues, test the running lights again to verify that they are working properly.
How To Replace Bulbs
When the running lights on your scooter stop working, it’s important to troubleshoot the issue and find a solution. One common cause of this problem is a burnt-out bulb. In this guide, we will show you how to replace the bulbs in your scooter’s running lights. By following these steps, you can get your scooter’s lights shining bright again in no time.
Locate Bulb Housing
The first step in replacing a bulb is to locate the bulb housing. The bulb housing is usually found near the front or rear of the scooter, depending on the model. Consult your scooter’s manual or look for the housing that corresponds to the running lights.
Remove Old Bulb
Once you have located the bulb housing, you can proceed to remove the old bulb. This may require the use of a screwdriver or other tools. Carefully remove any screws or clips holding the bulb in place.
- Disconnect any electrical connections to the old bulb.
- Gently twist the old bulb counterclockwise and pull it out of the housing.
Install New Bulb
After removing the old bulb, it’s time to install a new one. Make sure you have the correct replacement bulb that is compatible with your scooter’s running lights. Here’s how to install the new bulb:
- Insert the new bulb into the housing, aligning the pins or tabs correctly.
- Gently twist the bulb clockwise to secure it in place.
- If there were any electrical connections, make sure to reconnect them securely.
- Test the new bulb by turning on the scooter’s lights.
By following these steps, you should be able to replace the bulbs in your scooter’s running lights. Remember to always consult your scooter’s manual or seek professional help if you are uncertain about any aspect of the process. Now you can enjoy a safer ride with properly functioning running lights on your scooter.
Credit: visforvoltage.org
What To Do If Fuse Is Blown
If your scooter running lights are not working, one of the potential issues could be a blown fuse. The fuse is an important component that protects the electrical system from damage caused by excessive current flow. When a fuse blows, it interrupts the circuit, preventing further damage. To fix the problem, you’ll need to identify the fuse location and replace the blown fuse.
Identify Fuse Location
The first step in addressing a blown fuse is to locate it. The fuse box or panel is typically situated near the battery or under the scooter’s seat. Refer to the owner’s manual or consult the manufacturer’s website to find the specific fuse box location for your scooter model. Once you have located the fuse box, open it to access the fuses.
Replace Blown Fuse
After identifying the fuse box and accessing the fuses, it’s time to replace the blown fuse. Follow these simple steps:
- Identify the blown fuse: Inspect the fuses and look for signs of a blown fuse, such as a melted or broken filament.
- Get the correct replacement fuse: Consult the owner’s manual or check the specifications on the blown fuse to ensure you get the right replacement. It’s crucial to use the correct amp rating to prevent further electrical issues.
- Remove the blown fuse: Using a fuse puller or a pair of needle-nose pliers, gently pull out the blown fuse from its socket. Be careful not to damage the fuse box or surrounding components.
- Insert the replacement fuse: Take the new fuse and carefully insert it into the empty socket. Ensure it fits snugly and securely.
- Close the fuse box: Once the replacement fuse is in place, close the fuse box or panel securely.
After replacing the blown fuse, test your scooter’s running lights to see if they are now functioning properly. If they are still not working, there may be another underlying issue that requires further investigation or professional assistance.
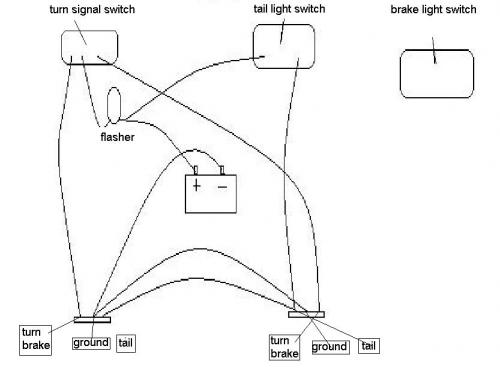
Repairing Wiring Issues
Is your scooter’s running lights not working? Don’t worry, we specialize in repairing wiring issues. Our experts will diagnose and fix the problem quickly to ensure your safety on the road. Contact us today for reliable and efficient wiring repairs.
Repairing Wiring Issues is crucial when it comes to fixing scooter running lights that are not working. Often, the root of the problem lies within the wiring connections or damaged wires. In this section, we will guide you through the steps to inspect the wiring connections and repair or replace any damaged wires.Inspect Wiring Connections
Start by examining the wiring connections of your scooter’s running lights. Ensure all connections are secure and free from any signs of damage, such as frayed wires or loose connections. Use the following steps to inspect the wiring connections:- Begin by turning off the scooter and removing the key from the ignition.
- Locate the running lights wiring harness. It is typically located near the front or rear of the scooter.
- Carefully inspect each connection point for any signs of oxidation, corrosion, or loose wires.
- If you find any loose connections, gently tighten them using a suitable tool.
- If you notice any signs of oxidation or corrosion, use a wire brush to clean the affected areas.
Repair Or Replace Damaged Wires
In some cases, the problem may lie in the wiring itself, with damaged or broken wires causing the malfunction. Here’s how to repair or replace damaged wires:- Using a multimeter, test each wire for continuity. This will help identify any faulty or broken wires.
- If you find a wire with no continuity, carefully remove the damaged portion of the wire using wire cutters.
- Strip the insulation off the ends of the wires, ensuring the exposed metal is clean and free from oxidation.
- Using a wire connector or soldering iron, join the two ends of the wire together.
- After connecting the wires, cover the exposed area with heat shrink tubing or electrical tape.

Credit: m.youtube.com
When To Seek Professional Help
Having trouble with your scooter’s running lights? If you’re experiencing issues with your scooter’s running lights not working, it might be time to seek professional help. Don’t let this problem go unnoticed – get the assistance you need to ensure your safety on the road.
Complex Wiring Problems
Scooter running lights not working can sometimes be attributed to complex wiring problems. In these instances, it can be challenging to identify the root cause of the issue without expert knowledge and specialized equipment. If you have checked the bulbs, fuses, and connections but still cannot get the lights to function properly, it may be time to seek professional help.
Expert automotive technicians have the skills and experience to navigate complex wiring systems. They possess the necessary diagnostic tools to identify and resolve potential wiring issues effectively. By entrusting your scooter to a professional, you can avoid further damage and ensure that the running lights are repaired correctly.
Inability To Diagnose The Issue
When your scooter running lights refuse to work despite your best efforts, it can be frustrating and time-consuming. Sometimes, the issue may be more complicated than a simple bulb or fuse replacement. In such cases, you may face an inability to diagnose the problem on your own.
A professional technician will have a comprehensive understanding of scooter electrical systems and be able to pinpoint the exact cause of the malfunction. Whether it’s a faulty relay, damaged wiring, or a defective switch, their expertise will enable them to diagnose the issue accurately. By seeking professional help, you can save yourself the hassle of guesswork and potentially prevent further damage to your scooter.
In conclusion, if you find yourself dealing with complex wiring problems or an inability to diagnose the issue, it is recommended to seek professional assistance. Not only will they have the expertise and tools required to tackle intricate wiring problems, but they can also save you time and effort in troubleshooting. Letting a professional handle your scooter running light issues ensures that the problem is resolved correctly and your scooter stays safe on the road.
Frequently Asked Questions On Scooter Running Lights Not Working
What Causes Running Lights Not To Work?
Running lights may not work due to various reasons such as a blown fuse, faulty wiring, a defective switch, or a burnt-out bulb. Check the fuse box, inspect the wiring for any damage, replace any faulty components and bulbs to resolve the issue.
Why Are The Lights Not Working On My Mobility Scooter?
Lights on a mobility scooter may not work due to several reasons: (1) Check if the battery is fully charged. (2) Ensure that the light switch is turned on. (3) Inspect the bulb or LED for any damage or loose connections.
(4) Consult the user manual for troubleshooting steps. (5) If problem persists, contact a professional technician for assistance.
Why Does My Scooter Headlight Keep Going Out?
A scooter headlight may go out due to issues like a blown bulb, loose wiring, or a faulty switch. Check the bulb first, then inspect the wiring for any damages or loose connections. If the issue persists, consult a professional for a thorough diagnosis and repair.
How Do You Turn On The Headlight On A Scooter?
To turn on the headlight on a scooter, locate the switch usually near the handlebars or dashboard. Flip the switch to the “on” position, and the headlight will illuminate, providing visibility and safety during nighttime or low-light riding conditions.
Why Are My Scooter Running Lights Not Working?
The most common causes for scooter running lights not working are blown fuses, faulty bulbs, or a faulty wiring connection.
Conclusion
To sum up, if you’re facing issues with your scooter running lights not working, it’s crucial to address the problem promptly. By following the troubleshooting steps mentioned earlier, such as checking the bulbs, fuses, and wiring connections, you can identify and resolve the issue effectively.
Remember, ensuring that your scooter’s running lights are functioning properly is vital for your safety on the road. So, don’t delay, take the necessary steps to fix the problem and enjoy a safe riding experience.